TENTS & FURNITURE

FROM BACKCOUNTRY TO THE BACKYARD
Be it a simple and fun backyard adventure or a full-fledged backcountry camping trip, get the right gear. From tents to camp furniture, we have them all.
Choosing a Tent
Tents, like houses, come in many different shapes and sizes, with many or few features. So, how do you know what’s the best for you?

Here are some things to consider when looking for a tent:
- Number of people
The number of people with whom you intend to share a tent will be a deciding factor in the size of tent you need. We carry tents as little as 20 square feet, as big as 350 square feet, and everything in between. - Where you’ll be camping
Depending on whether you will be driving to your campsite, canoeing or hiking, where you camp will play and important role in deciding what type of tent you’ll need. If you are carrying your gear to your site, a lightweight and compact tent is key.
- Features you need
You might be surprised to know how many features can come jam-packed in less than 50 square feet. You might need space to take off your muddy shoes, two doors so you don’t wake up your tent mate during a midnight bathroom run, or something that can be set-up quickly. - What season you will be camping
Just like the jacket you would wear, the tent you choose will largely depend on what type of weather you anticipate. Mesh panels are critical for ventilation, especially when camping in warmer weather. If you’re camping in winter, you’ll want something that’ll be able to handle the weight of snow and provide more insulation.
TYPES OF TENTS


Shop Family Tents
Although called family tents, it's not mandatory to invite your brother. Family tents are designed for multiple guests and have a ton of features and even multiple rooms. They are easy to set up and come in multiple sizes. These are the most popular type of tent.
Shop Family Tents

Backpacking tents
Made to be extremely lightweight, backpacking tents are made to be compact so they are easy to bring with you wherever your adventure takes you, along with the rest of your gear. Although some backpacking tents may fit up to 4 people, it’ll be a tight squeeze.
Shop Backpacking Tents

Cabela’s Alaskan Gudie Geodesic Tent
A tent to stand the test of time and beat the elements, the Cabela’s® Alaskan Guide Tent was developed over 25 years ago and continues to be one of our top-selling tents for all types of campers, from families to hunters. It's no surprise it has over 460 five-star reviews online.
How to Wash Your Tent After Camping All Summer
A season of camping puts your tent through the wringer: mud, dust, rain, campfire smoke, and who knows what else. If you want your tent to last, you can’t just roll it up and toss it in the garage. A thorough cleaning keeps it fresh, mould-free and ready for the next year.

What do you need:
- Cold to lukewarm water
- Microfiber cloth or a non-abrasive sponge
- Bath tub or a large tub
Step 1: Shake it out and inspect for damage
Give your tent a good shake to get rid of sand, dirt, leaves and anything else that found its way inside. Lay it out flat and check for rips, weak seams or work areas that need patching. If you see any, mark them with painter’s tape so you don’t forget.
Tip: Avoid machine washing at all costs. Washing machines even on delicate cycle can shred seams, stretch fabric and destroy waterproofing. Handwash is the only way when it comes to washing your tent.
Step 2: The right way to wash your tent
- Spot clean gently with a cloth or sponge. Pay extra attention to zippers and seams where dirt builds up.
- Lay the tent in a bath tub or a large tub. Fill it with cold to lukewarm water and add tent specific cleaner. Detergents or soaps can be harsh and can break down waterproof coatings. Follow the directions on the bottle to see how much cleaner to use.
- Unzip the doors and turn the tent inside out.
- Soak the tent and the rainfly in the tub. Follow the directions on the cleaner bottle for soaking duration.
- Rinse thoroughly, drain your tub and refill it with clean water. You may have to do this multiple times to get all the soap off.
- Set your tent up or hang it in a cool and shaded area until it is completely dry. Drying in direct sunlight will weaken the fabric over time because of UV rays.
- If there’s mildew, use an enzyme cleaner and follow the directions closely, especially with regards to how long you need to soak the tent.
Tip: If zippers are sticking, use a toothbrush to remove dirt and apply a zipper lubricant.
Step 3: Store it right
Once dry, roll or loosely fold your tent in a breathable cotton bag to prevent moisture buildup and extend its lifespan. Store it in a cool and dry place.
Avoid damp basements, attics or sheds. If this is your only option, try sealing it in a plastic container or bin.

Tips to Keeping Your Tent Clean When Camping
- Keep it clean: Although we all love the outdoors, let’s keep it outside. Take off your dirty gear, shoes, and anything else that might drag in dirt or debris inside the tent. It can damage waterproof coatings and tent fabric.
- Pick the right spot: Look for a smooth, level spot to pitch your tent that is relatively free of twigs, pine cones and rocks. Rough edges and debris could poke a hole in your tent. Try to set up your tent in a shady spot to avoid prolonged exposure to UV rays.
- Dry it out: When it’s time to pack your tent, make sure it’s dry and clean. If it rained overnight, try laying it out to dry in the morning before you pack it up. If that’s not an option, be sure to re-pitch it when you arrive home and air it out.
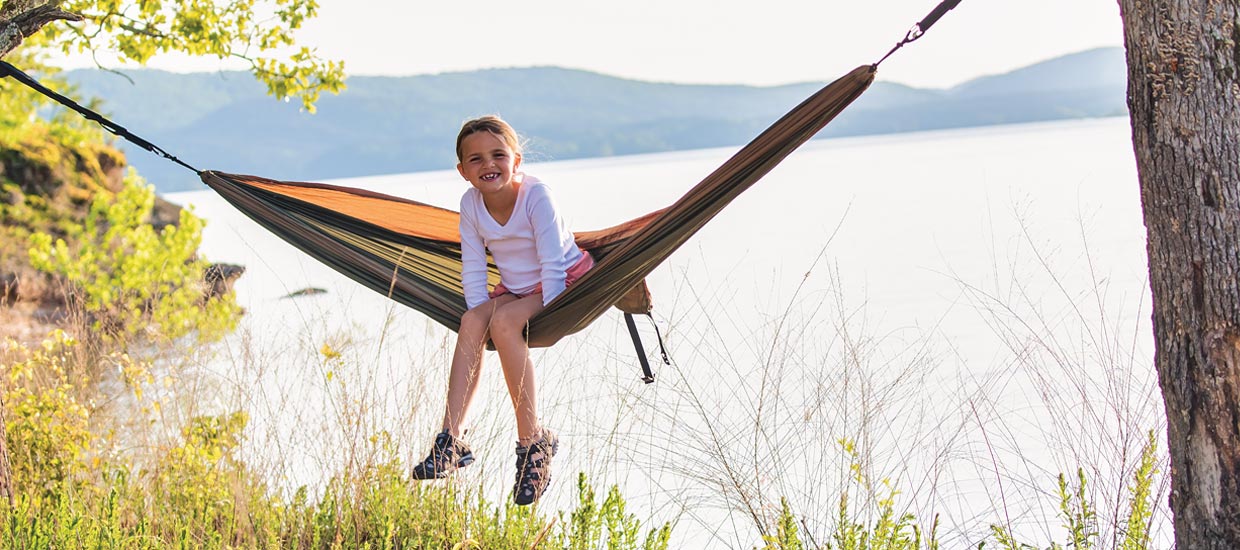
How to Camp in a Hammock
Hammocks are emerging as a popular option among many outdoor enthusiasts for their elevated vantage point, versatility, and simple setup. Ease in breeze as you sleep closer to the nature.
Learn how to set up your hammock and tips to make your camping memorable.
How to Set Up a Hammock for Camping
For a sustainable camping experience and a good night's rest, know how to properly set up your hammock.
- Choose the Right Spot
Before you set up your hammock, check the rules and regulations of the camping site. Look for an already-established campsite to minimize interference with wildlife and avoid pitching your hammock in areas that are not used by others. Set up your camp at least 200 ft away from a water source for safety reasons. - Choose the Right Tree
Pick a healthy tree that is at least 6 inches in diameter and free from nests or wildlife. Always use tree-saver straps (at least 0.75 - 2 inches wide) on the tree area where it has not been hammocked before.
Pro-tip: Avoid attaching multiple hammocks to the same tree.
- Set Up the Hammock to the Correct Height
For easy movement, set your hammock straps at about 30-degrees towards the tree at a maximum height of 18 inches. Look for a slight dip in the hammock even before someone sits in it. - Setting Up Rain and Bug Shelters
To set up rain and bug shelters, tension the tarp along the ridgeline and stake it around the edges. Secure the bug net to the hammock strap and add a ridgeline for access. The net usually has a zippered opening at its midpoint.
5 Tips for Comfortable Hammock Camping
- Along with the tarp, use a drip line to keep you dry on rainy days/nights. Drip lines prevent water from seeping down the suspension and soaking your hammock. Tie a rope on your hammock suspension cord, leaving two long ends of the rope hanging down. You can also use the drip line on your hammock tarp suspension for extra protection.
- Lay diagonally across the hammock. Instead of sleeping straight, laying diagonally will help your body to recline ergonomically flat across the fabric.
- Hang your foot on the hammock 8 to 10 inches higher than the other end to prevent your body from sliding down to the middle of your hammock.
- Use a full-length bug net to surround your hammock to create a safe and comfortable pod to rest and relax.
- If you are camping in cold or windy conditions, using an under quilt or sleeping pad will keep you warm and comfy. Using an under quilt beneath you at night will prevent drafts from reaching your body.

Campfire Furniture
With all the effort you put into camping, from trudging through treacherous terrain to setting up your campsite, it’s important that you relax. We can help you unwind with an array of chairs, tables and hammocks. At Bass Pro Shops and Cabela's, comfort is an outdoor thing.
9 Creative Ways to Use Your Screen House
Enjoy the world of fresh air without the bugs with a screenhouse, but why limit to it? Whether you want to create an outdoor working space or a yoga retreat, a screenhouse can come in handy.

While the possibilities are endless, here are nine different ways you can use your screen house this outdoor season:
- Work with a view: Rather than a traditional setup, a screen house with a comfortable chair and table with a view will be a great change for people who work from home.
- Entertainment: Take advantage of the screen house and turn it into an outdoor theatre. Install a projector and have fun-filled movie nights with friends and family.
- Sleep under the stars: Have your sleepovers under the stars in a protected and cozy screen room.
- Home Gym: Energize your workouts with the fresh air and natural surroundings, free from distractions.
- Creativity Pursuits: Let your creative spirit flourish in a space designed to inspire your favourite activities.
- Pet enclosures: Keep pets safe while they enjoy the outdoors. Give your furry friends the freedom to roam and play while ensuring their safety and security.
- Kids play area: Provide a safe outdoor play area for your children. Let their imaginations run wild as they play around in a secure environment.
- Yoga retreat: Create a serene space for your mindfulness and relaxation. Find your Zen amidst the soothing ambiance of the outdoors.
- Garden shelter: Protect your plants from pests and weather. Provide a nurturing environment for your plants to thrive from the harsh sun.
The key to any successful camping trip is planning and preparation. Be sure to create a checklist of the items you think you will need, so that once you’re out in the bush you can kick back, relax and enjoy.
Happy Camping!